Followers

Friday, 17 August 2012

Friday Show and Tell #6 with Angela


Embossing with your cutting dies


Taking a card blank, tape your chosen die in place with low tack tape on the reverse side. Place the card and die with the ridge side of the die facing your tan (or silicone) mat as below


(I used a Grand Calibur for my card but you can use any machine, just cut the card size to fit your machine and use the appropriate sandwich listed below.)

Place the base plate on the card using the fold line for your guide as you do not want to emboss beyond the crease in the card.


Run through your machine.

Once you have done this you have a card with one side embossed (if you use a similar die to mine)

I then ran the card back through my machine with another die taped to the front giving me the following result:
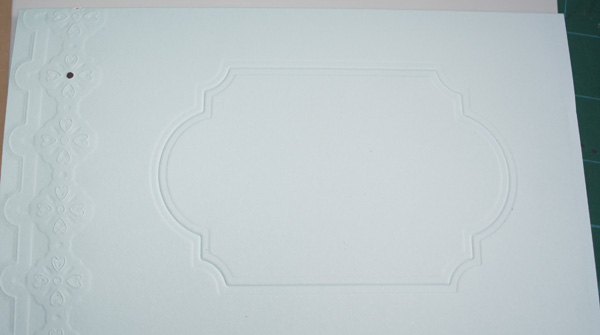


In order to emphasise the embossing you may wish to ink the front of the card like so:


Here is my finished card:


Of course all this can be done equally as well onto a piece of card which you would matt and layer it to the front of your card blank.


Big Shot:

Embossing Sandwich
1. Multipurpose Platform, Tab1 (flipped open to Tab 1)
2. Clear Acrylic mat*
3. Spellbinders™ die, blade side up
4. Paper or cardstock
5. Spellbinders™ Tan Emboss Pad
6. Clear Acrylic mat
7. Roll through Big Shot

Or Embossing Sandwich 2
1. Big Shot Impressions Starter Kit White and Black Mat (I believe that Big Kick has one of these as well, but I am not 100% certain)
2. Spellbinders™ die, blade side up
3. Paper or cardstock
4. Big Shot Impressions Starter Kit Black Impression Mat
6. Clear Acrylic mat
7. Roll through Big Shot

Cuttlebug ™:

Embossing Sandwich
1. A plate
2. 2 sheets cardstock to act as shim. Add extra pieces if needed.
3. B plate
4. Spellbinders™ die, blade side up
5. Paper or cardstock
6. Spellbinders™ Tan Emboss Mat
7. B plate
7. Roll through Cuttlebug™

Remember that each machine may be calibrated slightly different from the next. So experiment with your machine being certain not to force product through the rollers.

Monday, 13 August 2012

Design Team Inspiration Monday & Design Team Shout


Welcome to another Design Team Inspiration Monday, hope you enjoy this weeks selection of cards!!

Sarah


Materials
My minds eye lost and found collectionblack cardstockPaper flowerButtonsBakers TwineHandmade fabric flower


Ger


Supplies

Docrafts Glitter Velum, Sentiment, Bell & Snowflake Embossing Folder
Crafts Too Circle Die
Bling Coloured In Black

Ang


Supplies
Sassy Studio image coloured with Copic pens
Papermania flowers
Paper from Cardmaking magazine
Cheery Lynn dies
Spellbinders die
Card Candi


Design Team Shout

We are looking for 4 dedicated crafters, you can be a scrapbooker, card makers, altered artist ect who loves to work as part of a team :D

You will be expected to meet post commitments, work with sponsors, leave comments on our wonderful entrants cards and be an active member in Crafty Blogger Network Facebook group & have fun crafting that it!!!

If you think you'd be park of our team please create us one craft piece showcasing your work and add to the linky below and will be open till the end of August, good luck!!!


Friday, 10 August 2012

Friday Show & Tell #5.....with Ger

Ribbon Flower Tutorial


A circle of card is needed either from a punch or cut by hand


Add double sided tape to all of one side


Tie a knot to the ribbon you have chosen


Push knot into the middle of the card and start twisting the ribbon around on itself


At the same time as twisting lay down around itself on the card, keeping the sections close to one another so none of the white card is peeking through


Once all covered cut & glue underneath card as shown below


Attach your Ribbon Flower to your card as you would any other embellishment

Wednesday, 8 August 2012

Guest Blogger Wednesday with.......

This week on CBN we have the lovely Alison Lister as our guest blogger. So its over to Alison

 
Hi everyone my name is Alison, I have just turned the big 40, I have two beautiful daughters and 5 rescued cats. And would like to say thank you for the great opportunity of being a Guest Blogger for the Crafty Bloggers Network. So some more info about me. 
I have been crafting all my life in one way or another, be it cross stitching, card making, drawing or making stuffed animals to name but a few, but I did not get into card making full time so to speak until 2006 when I got married and moved in with my in-laws. While we lived there I had my own little caravan down the garden for all my craft goodies so needless to say I spent A LOT of time down there happily crafting away lol. However, in 2009 I left the in-laws (and the hubby lol) and moved back to my home town of Barnsley, and for a few months I did not do any crafting but this was due to all my goodies still being in boxes until I was asked to do a commissioned card for a friend, so I made it my mission to create a crafty corner in my bedroom and get all the goodies out of storage, since then I have not looked back and enjoy crafting as much as I can. Sadly I did have to take a break for a few months because as well as being a full time mum I am also a full time student and my course work needed to be completed, However now that I have finished the Access to HE Diploma course I have a few months free to craft before I start University in September in which I will be for-filling my dream of becoming a qualified counselling therapist. I know that this is going to be a challenge and that I won't have as much free time as I would like to craft but the end result will be worth it. My card-marking style varies depending what mood I am in or what I have been asked to make, and I have had some strange requests which I am sure all crafter's have, but I have loved the challenges and luckily for me what I have created has been well received and loved. 
Therefore the card that I have made for this challenge is a one of the kind as it was also made for a close family friends daughter who turned 18 and who is a huge Adam Lambert fan. How I achieved it was by downloading the photo's, I then printed them on to high gloss photo paper, I cut one out in a heart shape with my spellbinders wizard, I also added black and silver ribbon along with card candy and peel off's then added them all to purple pearlescent card stock and finished it off with flower and hearts. I also added a verse on the inside. Needless to say she was over the moon with it and stated it was the best card she had ever received.


I do have a blog where you can find more of my creations. You can find it HERE. It is sadly neglected due to my college commitments so has not been updated in a while, however it is on my 'to do list' lol therefore I would love it if you could drop by and say hi and I will return the favour. Anyway I think I have rambled on enough now so I will sign off ........ Would like to just say Happy crafting everyone and thanks again for allowing me this opportunity. Take care and blessings to all. Ali xx
Once again Alison, thanks for taking the time to join in with CBN, from all of the team.

Monday, 6 August 2012

Monday Challenge Number 2

Well it's time for our second challenge :D the team are thrilled to bits to have had so many of you talented peeps join in with us for our 1st challenge, it was truly fantastic but made the job of choosing the winner and top three extremely hard.

Our 1st challenge winner is

430- Tracy

Well done please email your name & address to craftybn@gmail.com

The fabb 3 are

472, 6 & 131
Please bear with us whilst we find the links to the numbers! There was a problem with
Mr Linky, but they'll be posted very shortly!! Thank you for your patience.

Well done please take your winners badge for you blog

Congratulations to the winners and if it wasn't you this month please don't let it stop you from entering we have loved looking at everyones work and you never know next time it could be you. We really hope you are loving all the new features as much as we are and loving the great range of sponsors we have supporting us by offering fantastic prizes each month!!!

For this challenge it's a double whammy as we have two great sponsors

Sassy Studio are offering
FOUR fantastic images of the Winner's choosing

Cullen Crafts are offering a mixed bad of yummy craft goodies with products from Docrafts, Rubber Stamps, Ribbons & Washi Tape


Right below is the design teams take on the theme of Pink & Black with some of the team working with both sponsors products

All the items used in my creation are available at our sponsor this month Cullen Crafts
for more details please go to my blog by clicking on my name above :)


Sarah

Supplies
Bazzil 12 x 12 card stock-black Patterned paper-Pink Paisley, Teresa Collins, My mind’s eye, Stampin up-twitterpated Ribbon Handmade fimo flowers (Mold muse moulds) Bazzil on the edge strips Stampin up elegant Eleanor stamps Stampin up ink-pink and brown Hand felted flower Stampin up Labels collection framelets Chipboard Butterflies (Cullen Crafts)


Kaz
Supplies
Digi stamp Ava from Saturated Canary
Paper Love Letters First edition
Flowers and gems from Papermania.

Ger


Supplies
Inspire Me Card Pack
Creative Expressions Bling Swirl
Pirate Doily
Basil Bobble Trim
All from Cullen Crafts
Dilly Beans Digi

Becky

Supplies
Sassy Studio Designs digi image
Promarkers
Stampin' Up sentiment stamp

Caz
Supplies
Saturated Canary Digi Freebie "Ava"
Copics
Glossy Accents & White Pen
Heidi Swapp Sugar Chic Papers
Craftwork Cards Stardust Cardstock
Craftwork Cards Sentiment
Pins, Tulle & Bling


Image - Sassy Studios
Colouring - pastels, watercolour pencils
Swirls - Kanban stamps
Momento ink

Friday, 27 July 2012

Friday Show & Tell #4... with Jo

Hi everyone...
Today, I want to share a fantastic technique that is always popular at my demonstrations, and this is how to use your die cutters to create a fantastic shaped edge to your cards!

So to begin, choose your image, stamp and colour - or even use a topper or decoupage - the choice is yours! I have taken the FREE stamp that comes with this month's Creativity magasine... isn't she beautiful?!

Then choose the die for the shape you want the edge of your cards to be. I just love this doorplate nesting die because it flows really nicely and fits perfectly over the edge of my square card!


Cut out the card edge with the die, then stick the chosen image over the top... trim the excess from underneath so that both edges are the same shape.

I stick the two pieces of card together so that it has extra support.

This is what the finished edge will look like.. see below? You can see the join where I have attached my image to the card blank.


Butt up some paper next to the join where card meets card, then blue and trim to size at top and bottom.

Cut the edge slightly wider than the card, then fold back onto the rear of the card, stick down and decorate with a peel off.

Also remember to line the inside part of your card too - the shaped edge will reveal the section underneath, so make sure you add some paper to where it is visible.

Ink up the edges with colours to match your image - I chose yellow and lilac. The take a mini stamp from the same FREE pack of stamps and stamp lightly around the edge with yellow ink. Use a dry baby wipe to ink up the edges.

I hope you get some enjoyment out of playing with your dies, and come up with some wonderful shaped cards... if you do, remember to post your entries here so we can come and view your cards too!!!

Wednesday, 25 July 2012

Celebrity Guest Blogger Wednesday........


........This week we have the wonderful Kim Reygate joinging us as our Celebrity Guest Blogger
How long have you been crafting? - I have always loved sewing,
knitting, crochet, tapestry and patchwork but didn't get into
cardmaking until 1995. I met Maggie Wright at a craft show in London 
who introduced me to Rubber Stamping, and the rest, as they say, is 
history. My goodness it sure doesn't seem like 17 years ago!! 

How did you start crafting? - My Grandma and Auntie taught me all my
needlecrafting skills but I thought that to be Creative you had to be
able to draw like my Mum, something that I definitely can't do.
Stamping allows me that creativity. 

What is your favorite product line? - I love all things stamping and
heat embossing and there are just too many wonderful companies out
there whose products I get to play with on a regular basis to narrow it
down to one specific thing. 

What do you watch/listen to when you're creating? - I have to have the
TV on when I am working and I am addicted to American Dramas in
particular things like CSI, Bones, NCIS and Criminal Minds. In fact
there are just too many to list. My sky box is always full lol.

What do you snack on while crafting? - There is always a cup of coffee
on the go but I try not to snack too much, all this card making is
playing havoc with my waistline anyway. Well that and getting older :O) 

Any paper crafting pet peeves? - I do hate having to tidy up in 
between projects but apart from that I can't think of anything, 
although I am sure that there will be something I think of as soon as 
this goes live. 

Share your favorite tip/trick with the readers. - Never be afraid to 
play. At the end of the day it is just a little bit of ink, paper and 
time. 

What is your favorite color combination to use on your cards? - I love 
Black and white and pale blue or pink with brown, but I don't think 
that I have a real favourite that I use all of the time. Most of the 
time it depends on what stamps I am using or who the card is being made 
for. Thats why I like the challenges, they make me try out new things. 
 
Do you distress everything, not at all or somewhere in between? - i 
couldn't be without my Distress ink pads, but i think I'm somewhere in 
between when it comes to real distressing. 
 
What is your favorite tool in your scrappy space? - I couldn't live 
without my Guillotine or Score it Board. 

What is your favorite item in your scrappy space?

When creating a project, do you plan it out or go with the flow? - I 
could no more tell you what a project is going to look like when I 
first sit down to start it than I could fly to the moon. A project just 
evolves. Sometimes I will just start by going through my box of papers 
to find things that will go with the stamped piece that I have created.

What type of adhesive do you use? - I must get through a roll of double 
sided tape and a tube of Silicon every couple of weeks!! 
 
What is your favorite kind of cardstock? - Bazzil cardstock has to be 
my favourite although I use 300 gram white card as the base for most of 
my cards and then add coloured card and papers to the front making my 
coloured card go much further. Mind you if I lived to be 103 I don't 
suppose I could use all of the stuff that I own, it doesn't stop me 
buying it though. I need, I want, I have to have :O) 
 
Do you enjoy stepping out of your zone when creating new projects? - I 
do love a challenge. I guess i still stay in my comfort zone to a 
degree but it's good to try ideas and colour combos that I wouldn't 
usually choose. I still tend to stick to cards though, I'm not so good 
at coming up with ideas for other things, thats what places like 
Splitcoast Stampers and all of the challenge blogs out there are for. 
 
About how many projects do you create in a month? - I guess that I sit 
and craft most days after work. It is my way to wind down. I've never 
counted how many things I make in a month, a lot will depend on whether 
or not I have samples for the TV to make. I make samples for Barbara 
(Clarity Stamps), Jenny (Hobby Art) and Sue (Imagination Crafts) as 
well as teaching twice a month and then there are several friends who 
get me to make all of their special cards, so sometimes it feels like I 
don't do anything else but go to work and then come home and craft. 
It's a hard life but some one has to do it lol. 
 
When is the best time for you to create? - I work full time and so 
weekends are definitely a good time for me to catch up with things. I 
also try and do something most evenings.


Kim has made such a beautiful card for this weeks post i'm sure you'll all agree :D


Monday, 23 July 2012

Design team Inspiration Monday

Welcome to another Design Team Inspiration Monday with another lovely selection from the team, enjoy & Happy Crafting xxx

Ger


Wishi Tape
Hero Arts House Stamp
Glitter Alphabet Peel Offs


Sarah

   
 Supplies A4 cardstock (Blue) Onesie Template (See my blog for free template) Graphic 45 little darlings collection Graphic 45 Little darlings stickers Stampin Up bakers twine Stampin Up seam ribbon Selection of buttons Stamoin Up Everything Eleanor stamp set


Jo


Thanx for stopping by we hope you enjoyed todays Monday Design Team Inspiration
Happy Crafting Crafty Bloggers Network Team x