PAGES

Monday, 22 October 2012

Design Team Inspiration Monday

Wow another week has passed so that time for another selection from the Design Team :D 


Supplies
Ranger Distress Ink-Walnut
Clear Embossing Powder
IndigoBlu 'Nature 1' Rubber Stamps
Golden Foil Card

 Supplies:
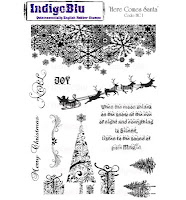
Indigo Blu Stamp set: Here Comes Santa
Cardstock


Supplies:
Papermania 'Me to You' range
Cardstock: Neenah white, silver mirri, Kraft, Core'dinations
Dies: Memory Box Mod Tree, Whiff of Joy Snowflakes, Tim Holtz Festive Greenery
Stickles


Supplies
Baby stamp from Pink Gem
Spellbinders dies
Promarkers
Cuttlebug embossing folder swiss dots
Dovecraft twine.

Wednesday, 17 October 2012

Guest Blogger Wednesday

This week we have the lovely Kara as your guest blogger who not only brings you 1, not 2 but 3 wonderful projects for you to have a go at. So its over to Kare.
Hi, my name is Kara Milne. I have been paper crafting seriously for nearly 10 years, but before that I tried lots of different crafts. My passion was scrapbooking for many years but I now do a wider variety of paper crafts as I sometimes teach and demonstrate, and people like variety! My projects today have a bit of a story- I made a small Christmas decoration with paper cones a couple of weeks ago (its on my blog) and it came together so quickly I decided I had to experiment a bit more and see what else I could make with them. So here they are. My first project was using a polystyrene cone, this took a few attempts! You have to use smaller cones as you progress up the tree, I had a few dodgy looking try's at this! I started with 2 1/2 inch squares for 2 rows then 2 inch and finally 11/2 inch squares for near the top. You can use wet glue ( with a wee clip to hold it until its dry) or red tape for a uniformed closed looking cone, or staple the base of the cone and you get a looser look at the top- experiment as its just tiny pieces of paper you'll be using so its no great loss. I used stampin up 12x12 paper "be of good cheer". And I have heaps left for other projects, on the top is some cherry cobbler seam binding ribbon also from stampin up and a couple of jingle bells from my local craft shop. Once I started with the cones I was hooked- so here's project number 2 at a cost of nearly nothing! I used pages from an old paperback ( and I picked a really old one with yellow pages I bought at a jumble sale) and I just stapled these at the base, as it was book pages the cone was curled around more than the squares when I made them. I started with a piece of stiff cardboard or thin chipboard and traced round a dinner plate to get a circle, and put on my first layer of cones overhanging the edge ( lay them out first before you stick anything down, you want them side by side but not squished in, or have big gaps in between). I used a hot melt glue gun for speed in drying, but pva and patience works fine! The second and third rows were stuck in the dips between the bottom layers to give a staggered look. Once these were set, I stuck down some stampin up Scalloped tulle ribbon and some die cut snowflakes, and a vintage brad. Finally, just one more. Same idea, squares of paper, rolled into cones and stapled, only this time I used a polystyrene ring (about 25cm diameter) which cost just over a pound and I used 4 inch squares of double sided papers. Thanks for looking, if you have any questions you can always leave a comment on my blog,Kara's Crafty Corner, and I will try and answer them if I can. Thanks for looking Kara
And i am sure you will agree Kara's projects are just beautiful. And a big thankyou to Kara from all the team at CBN.

Monday, 15 October 2012

Design Team Inspiration Monday

Here are the Design Team Inspirations for this week 

Ger 


Supplies
Docrafts 6x6 Kraft Card
Washi Tape
IndigoBlu 'Nature 1' Stamp Set


Supplies:
 Image: Elizabeth Bell digi 'Creative Genius'
Spectrum Noirs
Papers: Prima Nature Garden
Spellbinders Edgabilities and Scalloped Circles
Marianne Designs die
Core'dinations and Neenah cardstock
Sentiment: Computer Generated
Prima flowers


Supplies

Digi Stamp from Passion for stamps
Spellbinders dies
Martha Stewart border punch
Marianne flower die
Cheery Lynn leave die
Cuttlebug embossing folder
Promarkers
Ribbon
Gems
Papers picked up at a craft fair.  


Sarah


 Supplies

Docrafts creativity club downloads:Boutique butterflies, boutique backgrounds
Docraft Happy days ticket stub stamps adhesive stones capsule sunshine
 Welligton Bear die cuts
 Foam pads
Stampin Up seam binding
 & bakers twine

Friday, 12 October 2012

Homemade Daybook Tutorial...

Having recently fallen in love with the Amy Tangerine Daybook, I decided that I wanted to have a go at making my own....after all that is how Amy came up with the idea of the books...she made one with scraps left over from a demo she was doing at CHA...

So the first step is to make a cover. I use Bazzill Kraft cardstock and a piece of overlay/acetate.
This book measures 7.5 x 5.5 inches. The overlay/acetate measures 5.5 inches deep and is very slighty shorter that the cover so that it doesn't hang over.
The inside pages are made from double sided papers...if they are a little thicker than paper that is better as it gives the pages more support. Cut them in a variety of sizes smaller than your cover.
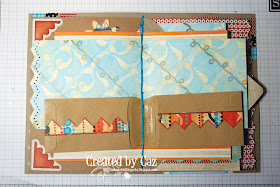
As you can see I have included some envelopes in my book, plus used some decorative edges to the pages...plus some washi tape and stickers.
More of the inside pages...
More of the inside pages, envelopes and stickers...
Now back to decorating the cover. I added some washi tape to the inside and sticker that goes with the paper range I used. I stuck the sticker over the busy overlay/acetate on the front so that it created a place to put the title of the album at a later date.
The inside of the cover is decorated with more washi tape and another sticker.
Now the cover and insides are ready I added the clips to hold all the pages in place ready to make the holes for hand sewing the book together.
As you can see in the picture I have added holes down the centre fold of the album using an embroidery needle and foam mat.
When I start sewing from the second hole down and then back one hole and forward two holes....it means you over sew, but it makes the binding nice and strong.
More of the sewing...
A close up of the sewing.
Further down and you can get more of an idea...
Sewing all done, and as you can see you get a neat(ish) sewn line down the centre of the daybook.
Here is the sewing from the outside...
And finally the finished daybook with a paperclip added to hold it together neatly.

I hope this explains everything, and inspires a few of you to have a go at your own book. It is a great way to use up all the pieces of patterned paper you have laying around. Also it is a great saver as the Amy Tangerine Books cost between £6.99-£9.99, and I have estimated that this book cost me about £4 to make and it is utterly unique. If you are a cardmaker with mainly 6x6 pads laying around then don't think you can't have a go at this...I have made another album that is just 6.5 x 4.5 inches and all the pages inside are made from a 6x6 paper pad.

Monday, 8 October 2012

DT Inspiration Monday - October 8th

Another monday, another batch of cards to hopefully inspire you, dont forget the monthly challenge for October is "Anything Goes" your chance to win a stamp sheet from our sponsors Indigo Blu


Supplies:
Indigo Blu Stamps: Here Comes Santa
Here Comes Santa Stamps from Indigo Blu

White Card
Chipped Sapphire and Mustard seed Distress Ink
Mirror paper


Kaz
 

Supplies

Red card
Santa from IndigoBlu Retro Christmas set
 Retro Christmas stamp set from Indigo Blu
 Paper brought from a craft show not sure who's they are.
Promarkers
Spellbinders dies
Cuttlebug snowflake die
Sentiment stamp LOTV
Gems


Wednesday, 3 October 2012

Guest Blogger Wednesday - get to know the DT

We thought it would be a good idea for you to get to know a little about our design team so for the guest blogger spot of the next few weeks will be introducing the team to you.

First up is Angela Drummond

If you have a blog, what's the blog address..?
www.craftyblether.co.uk

How long have you been crafting?
As long as I can remember in some form or another

How did you start crafting?
I started doing cross stitch when I was little and got into paper crafts a lot later, I started scrapbooking when my oldest son was born (9 years ago)  My main focus now is cards, tags ATCs and altered projects. I do digital scrapbooking and hybrid crafting as well.

What do you watch/listen to when you're creating?
I generally have Create and Craft or Radio 2 on in the background depending on what mood I'm in

Do you distress everything, not at all or somewhere in between?
It really depends on the card so I would say I'm a somewhere in between girl

What is your favourite tool in your scrappy space?
Got to be either my Grand Calibur or my Copic pens - I wouldn't be without either!

What is your favourite item in your scrappy space?
An altered birdhouse that someone made me in a swap that I took part in

When creating a project, do you plan it out or go with the flow?
I tend to go with the flow most of the time unless I'm doing a sketch challenge or something like that.

What type of adhesive do you use?
Once again it depends on what I am making, I love my tube of Scotch glue that my pal in the States sent me but I also wouldnt be without my pinflair.

Monday, 1 October 2012

Challenge Number #4 sponsored by Indigo Blu

Well it's time for our 4th challenge :D thank you to everyone who entered last month once again it has been a tough job to decide the winners, but here are our choices
The Crafters Companion prize goes to:

Number 11: Nat

please email us at craftybn@gmail.com to claim your prize.

And our top 3 chosen by the design team are:


Congratulations girls, please feel free to grab the top 3 badge on the right to display on your blogs

Challenge Number 4

Now onto our challenge for this month which is sponsored by Indigo Blu
The prize will be an A5 stamp sheet chosen by the winner

Quintessentially English rubber stamps, with unique and highly detailed deep etched designs – all made in England. Do have a look in our shop where we’re adding exciting new stuff all the time. Please sign up for our e-newsletter to enter our weekly draw for an individual stamp of your choice, and we’ll keep you up to date on all that’s happening in IndigoBlu World, especially the new designs which we are constantly working on…

The challenge is  Anything Goes, thats it, so it can be anything you like, card, scrapbook layout, ATC or altered project.

You may also notice we have a new addition to the team Geraldine McCormick who we sneaked in last week for Design Team Inspiration Monday, I'm sure you'll join us in giving her a warm welcome to the team :D

Here are the design team's projects for you:


Supplies:
Indigo Blu stamp set: Here Comes Santa
Guilding flakes
That Special Touch Mask: Skyline
Distress ink: Chipped Saphire and Stormy Sky
Spray and Sparkle Gold
Gold embosssing powder
Momento Ink: tuxedo black
Clear embossing powder


Ger

Supplies:
Docrafts Happy Days 12x12 Papers
IndogoBlue Nature 1 Stamp Set
Momento Ink- Potters Clay


Supplies:
Indigo Blu Retro Christmas 
Memento ink Lady Bug
Ribbon
Twinkling H2o's Irish Mist
Papermaina Christmas time vellum
Spellbinders Dies
Gems. 

Caz

Supplies:
Indigo Blu stamps - Wild Meadow
Tattered Angels Glimmer Mists - Pink Taffy, Juniper & Jack O'Lantern
Craftwork Cards Stardust Cardstock - Calcutta
4" paper doily
Tulle
Versafine Black Ink
Foam Pads


Supplies:
Image: Wee Stamps
Medium: Promarkers
Papers: Echo Park Country Drive
Sentiment: Computer Generated
Ribbons: Papermania
Stick Pins: Creative Expressions
Stickles 


 Supplies:
Indigo blue stamp:Poppy Meadow
 Prima, 7 Gypsies, and Stampin up patterned paper
Brown, red, green and cream cardstock 
Red binding ribbon
Foam pads
Black stazon